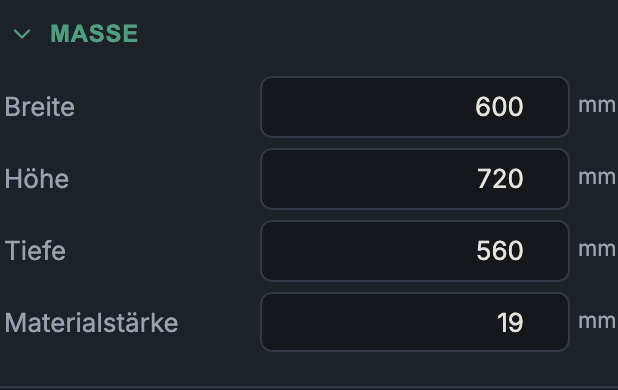
Dimensions
The Dimensions group sets the outer dimensions of the carcass. All values are in millimetres. From the outer dimensions and the material thickness, the app calculates the free interior (carcass clearance): in width and height, two material thicknesses are lost each (left/right and top/bottom respectively), while the depth stays full.
Label
The name of the carcass (e.g. "Base cabinet left"). It appears in the carcass list, as the heading of the inspector, and groups the parts in the cut list, drawing and 3D export.
Width
- What it does: Outer width of the carcass (range 50–3000 mm). The usable
interior is
width − 2 × material thickness. - When to use it: A standard measurement in every plan. In a run of kitchen units, the sum of the widths (plus reveals) determines the overall length.
- Pros & cons: Wide carcasses save side panels, but tend to sag with a continuous top/bottom — in which case stretchers or additional vertical dividers help.
Height
- What it does: Outer height (50–3000 mm).
- When to use it: Carcass height without plinth and without worktop — these are added in the project (see Plinth & Worktop).
- Pros & cons: With drawers, the height is distributed across the individual front heights; very tall cabinet sides may need a stronger joint.
Depth
- What it does: Outer depth (50–1200 mm). Determines the length of bottoms, top panel, shelves and drawer boxes.
- When to use it: Common carcass depths are e.g. around 560–580 mm (kitchen base cabinet) or 300–400 mm (wall cabinet).
- Pros & cons: More depth = more storage, but also more material area per bottom. The drawer box depth results from the carcass depth minus runner clearance and back panel depth.
Material thickness
- What it does: The thickness of the carcass panels — display only, not directly editable (greyed out, range 8–40 mm).
- When to use it: It follows the chosen carcass material automatically: a panel is its thickness. If you want a different thickness, choose a different material in Material & Edge Banding (or change its thickness in the material editor).
- Pros & cons: This coupling prevents the classic mistake of the intended thickness and the actual panel thickness drifting apart. The material thickness feeds into almost every calculation (interior dimension, groove-depth limits, dovetail spacing, joint geometry).
Next: Material & Edge Banding