Back panel
The Back panel group determines whether and how the carcass is closed at the rear. The back panel braces the carcass against racking and closes it against dust — the way it is fixed is a classic difference in quality and effort in furniture making.
Type
None
- What it does: Open back, no back panel.
- When to use it: Open shelving, carcasses that are screwed to the wall and do not need bracing from the back panel.
- Pros & cons: Saves material; no bracing, no dust protection. The carcass must then derive its rigidity from the corner joint/stretchers.
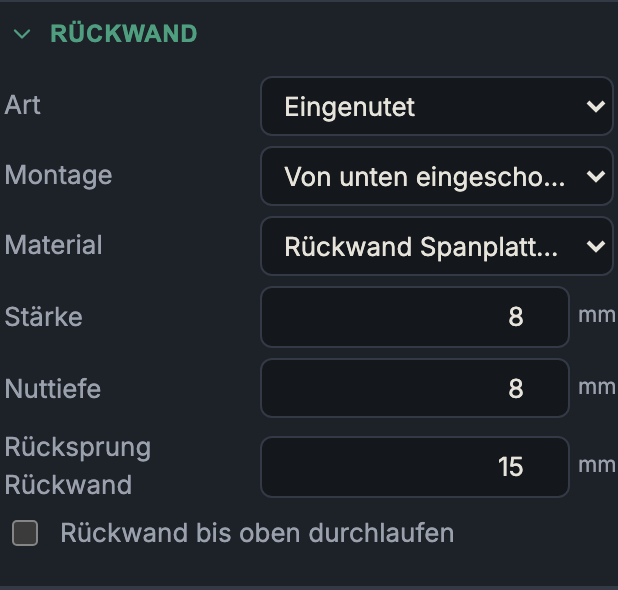
Grooved
- What it does: The back panel sits in a groove (dado) in the carcass panels. Additional fields: material, thickness, groove depth, back panel setback (distance from the rear edge) and optionally run back panel through to the top. Plus the assembly (see below).
- When to use it: The clean solution, invisible from the outside — the default setting.
- Pros & cons: Hidden, dust-tight, braces very well. A bit more effort (rout the groove, mind the assembly sequence).
Overlay
- What it does: A full-size panel is laid on at the rear and screwed/stapled. Additional fields: material, thickness.
- When to use it: Workshop furniture, quick assembly, back panel that can be fitted/removed later.
- Pros & cons: Very simple, good bracing over the full surface; projects beyond the carcass depth at the rear and is visible from the side.
Rebated (rebate)
- What it does: An L-rebate is routed into the rear inside edge of the sides + top panel + bottom; the back panel drops into the rebate, its rear face flush with the carcass back and concealed from the side. Additional field: rebate width (overlap) = how far the back panel reaches into each rebate.
- When to use it: The cabinetmaker's standard for visible/freestanding carcasses — concealed like the groove, but easier to fit.
- Pros & cons: Visually clean (flush, concealed at the sides), well accessible during assembly; slightly more material removal than a groove.
Assembly (only for "Grooved")
How is the grooved back panel installed?
Slide in from below
- What it does: Groove only in the two sides + top panel; the bottom and plinth stay open at the rear, so the back panel is slid in from below and screwed to the rear edge of the bottom.
- When to use it: When the carcass is already glued up and the back panel should be installed last.
- Pros & cons: Back panel can be fitted/replaced later; not captured all around at the bottom. (A slid-in back forces the plinth to have at least its own clearance at the rear setback.)
Captured (groove all around)
- What it does: Groove in all four panels (incl. bottom); the back panel is placed in during assembly and is captured all around.
- When to use it: Maximum bracing and a dust-tight seal at first assembly.
- Pros & cons: Captured all around, very rigid and tight; but can only be placed in during assembly (cannot be replaced later).
Back panel dimensions
- Material / thickness (3–19 mm): its own material choice (often 3 mm HDF or 8 mm chipboard); counts separately in the material list.
- Groove depth (for "Grooved", 4 mm up to half the carcass material thickness): how deep the back panel reaches into the carcass panels.
- Rebate width (overlap) (for "Rebated", 4 mm up to half the material thickness): how far the back panel engages the L-rebate.
- Back panel setback (for "Grooved", 0–40 mm, default 15 mm): how far the back panel sits inward from the rear edge — creates space at the rear, e.g. for cables or a clean gap from the wall.
- Run back panel through to the top (for "Grooved"): lets the back panel run to the full carcass height, instead of ending in a rebate below a flat stretcher / the top panel. Hidden when the top is an upright stretcher (which already runs the full height anyway).
Next: Front & compartments