Front & Compartments
The Front group is the heart of it all: this is where you divide the carcass into compartments and decide, for each compartment, what sits at the front — nothing (open), doors or drawers. Doors and drawers each have their own detail options (hinges or corner joint, heights, bottom).

The compartment tree (layout)
At the top of the group you see the compartment tree. Every carcass starts as a single compartment (the root). You can split any compartment further as often as you like — even nested, i.e. a grid of compartments.
- Select a compartment: Click a compartment's label — its front/bottom options appear beneath it.
- Split vertically (⬌): Inserts a vertical divider → left + right sub-compartment.
- Split horizontally (⬍): Inserts a horizontal divider → lower + upper sub-compartment.
- Remove split (✕): Undoes the split; the first sub-compartment becomes the compartment again (its configuration is preserved).
- Position (%): With a split selected, you move the divider (15–85 % of the inner width or height).
Why it works this way: With the tree you can build, say, drawers on the left and a door on the right in one carcass, or a 2×2 grid. Each leaf compartment is configurable independently. When you select a split node, you can only change its position — to configure, select a leaf sub-compartment.
Note on the geometry of the split
A vertical/horizontal divider is a real panel (role "vertical divider") in carcass material thickness. Internal dividers deliberately stop a little short of the back panel so they don't collide with the back panel's groove/rebate. The divider position is internally clamped to 15–85 % so no unbuildably narrow compartment can arise.
Variant (front type per compartment)
For a selected leaf compartment you choose the variant:
Open
- What it does: No front element — an open compartment / shelf bay.
- When to use it: Shelving, niches, compartments meant to stay open. With "Open" (and with "Doors") the shelves appear beneath it.
- Pros & cons: No hardware, full access; no dust protection / no concealment.
Doors
See the Doors section below.
Drawers
See the Drawers section below.
Doors
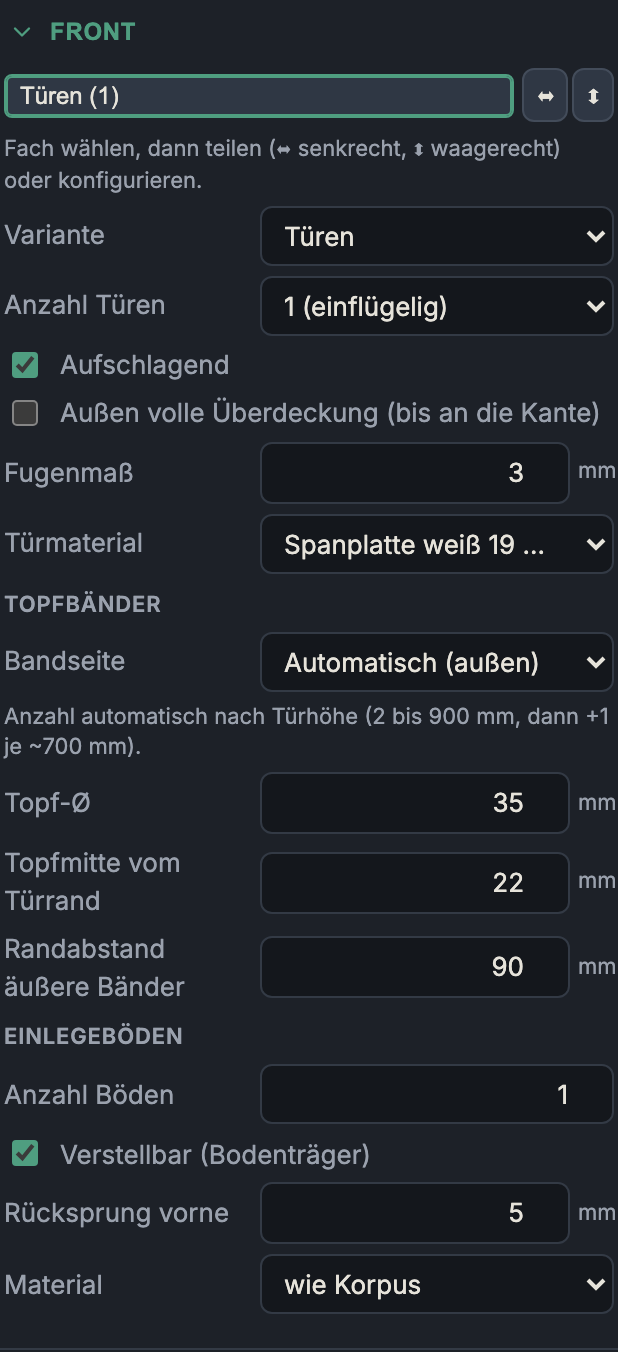
Number of doors
1 (single leaf) or 2 (double leaf). Double leaf splits the opening down the middle into two doors with a gap between them.
Overlay vs. inset
- Overlay on: The door sits in front of the carcass and covers the front edges (overlay). This is the modern standard construction.
- Overlay off: The door sits in the opening (inset), flush with the front edge of the carcass.
Important: "Overlay" is a decision for the whole carcass — it applies uniformly to all doors and drawers of all compartments (otherwise fronts in a row would project by different amounts).
- Overlay pros & cons: Covers the carcass edges, forgives tolerances, full clear opening. Stands proud of the carcass.
- Inset pros & cons: Classic, flush appearance (the door sits "in" the piece); demands tight, even reveals and therefore more precision.
Full outer coverage (out to the edge)
Overlay doors only: the outer doors cover the carcass out to its outer edges (no
surrounding shadow-gap reveal); the gap between the doors remains. Off = an even
Fugenmaß reveal all around (the default, correct for carcasses that stand side by
side in a row).
Gap/reveal
The gap around and between the fronts (0–10 mm, default 3 mm). It governs both look and function: too tight and it binds, too wide and it looks untidy.
Door material
A separate material choice for the doors (independent of the carcass, e.g. a 19 mm decor panel).
Concealed (cup) hinges
- Hinge side: Which vertical edge the concealed hinges (and their cup holes) sit on — Automatic (outer) (left door on the left, right door on the right; a single door on the left), or fixed Left/Right.
- Automatic count: The number of hinges follows the door height (2 hinges up to 900 mm, then +1 per ~700 mm). This mirrors the hardware rule of thumb.
- Cup Ø (20–40 mm, default 35 mm): diameter of the cup hole (a standard concealed hinge = 35 mm).
- Cup centre from door edge (16–30 mm, default 22 mm): distance of the cup centre from the door edge.
- Edge distance of outer hinges (40–150 mm, default 90 mm): distance of the topmost/bottommost hinges from the door ends.
The cup holes appear in the machining / hardware list and (when holes are shown) in the 3D model.
Drawers
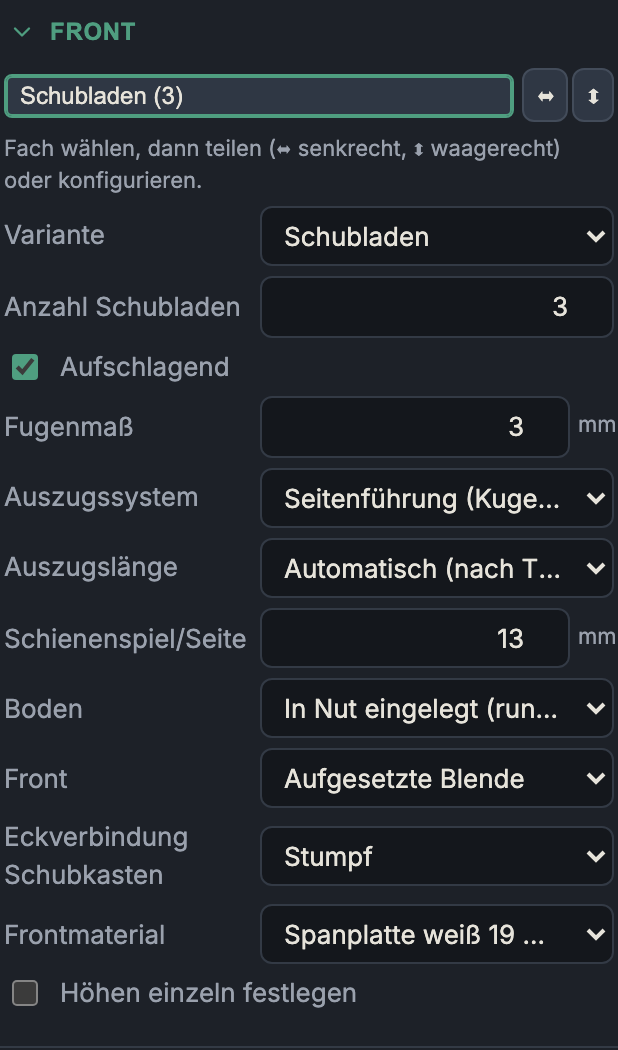
Number of drawers
The number of stacked drawers (1–8). On change, the heights are redistributed evenly.
Overlay
As with doors — applies carcass-wide (see above). Overlay drawer fronts cover the carcass, inset ones sit in the opening.
Gap/reveal
The gap around/between the fronts (0–10 mm, default 3 mm).
Runner system & runner length
Here you choose the runner product for this drawer — from it the drawer box (wood or metal side) and the matching hole pattern follow automatically. The list contains common systems from Blum, Hettich, Grass, a generic side runner and Custom (dimensions) for a manual hole pattern.
You don't need to know whether a system is side- or under-mounted — that is stored in the product:
- Side mount (ball-bearing runner, Blum 230/430): rail on the carcass side and the drawer side → wooden box with the options below.
- Undermount (Movento, Tandem, Quadro, Dynapro): rail beneath the box → wooden box, carcass-side drilling only, the wooden side stays clear.
- Metal side systems — Legrabox, Metabox, Tandembox antaro, Vionaro: the sides are the metal rail (not modelled). No wooden box is created — only the bottom and back panel are cut to the manufacturer's dimensions (width from the clear carcass width, bottom depth from the runner length, back panel height per rail height class, 16 mm). The wooden-box options below then disappear.
Runner length shows only lengths that fit the carcass depth; Automatic takes the longest. If none fit, a note appears (build deeper or choose a shallower system). You switch on the drilling of the rail holes in the Holes group.
The following box options (runner clearance, bottom, front type, corner joint) apply only to wooden boxes (side runner/undermount/custom dimensions) — with metal side systems they are hidden.
Runner clearance/side
The clearance per side between the drawer box and the carcass for the runner system (5–20 mm, default 13 mm — matching a 25 mm full-extension runner). It determines the width of the drawer box (clear carcass width minus 2× runner clearance).
Bottom (drawer box bottom, bottomMount)
- Grooved in (all round): bottom in a groove in all four box parts — clean, concealed, dropped in during assembly (a thin bottom, e.g. 6 mm HDF).
- In groove, slid in from the back: groove only in the sides + front; the bottom is slid in at the back (the back piece stays open).
- Applied underneath (screwed on): a full-area bottom screwed/nailed under the box — simple, no groove, easy to replace; common on workshop / utility drawers.
Front (front type, frontType)
- Applied front: a separate front is screwed in front of the box; the box has its own front piece behind it (the default). It can be aligned later — the professional solution.
- Integrated front (solid): no separate front — the front piece of the box is the show face (front material, joined to the sides). The classic solid-wood drawer; the only construction in which a half-blind dovetail is meaningfully visible at the front.
Drawer box corner joint
How the box corners are joined:
- Butt: front/back piece sit between the sides (the simple default).
- Box joint: interlocking fingers; front/back piece span the full width of the box.
- Dovetail (through): through dovetails — the sides carry the tails, the front/back piece the pins.
- Dovetail (half-blind): half-blind at the front (concealed on the show face), through at the back — the classic drawer-box joint.
Additional fields:
- Finger width (6–40 mm, for all but "Butt"): a fixed spacing across all drawers and all four corners, so the same division runs everywhere (partial cells fall at the ends). 0 = automatic.
- Dovetail angle (5–20°, default 8°, only with "Dovetail through"): as a dovetail cutter is sold.
Front material
The material of the drawer front (independent of the carcass and the box).
Set heights individually
From 2 drawers on: instead of an even split you specify each front height individually.
- What it does: Enables the individual "Height of drawer N" fields. When you change one height, the others redistribute automatically so the stack always fits exactly in the opening (the total stays constant).
- Lock a height (padlock icon): A locked height stays unchanged and is left out of the redistribution — so you can, for example, keep a shallow top drawer fixed and let only the lower ones grow.
- When to use it: Tool cabinets, cutlery inserts, a deliberate height progression (shallow at the top, deep at the bottom).
- Pros & cons: Full design control; the automatic redistribution prevents the total from over- or undershooting the opening (each drawer keeps at least 40 mm). Without this option the app splits the opening evenly.
Next: Shelves